How to Make an Image Semi-transparent in Powerpoint
It's now easier than e'er to brand an image transparent in PowerPoint!
If yous a have the latest version of Microsoft Function (see Microsoft 365 hither), there is a Make NEW transparency tool built right into the Picture Tools Format tab.
To see this in action, lookout man the video, or gyre down the page for more details.
[Watch] Make an image transparent in Microsoft 365
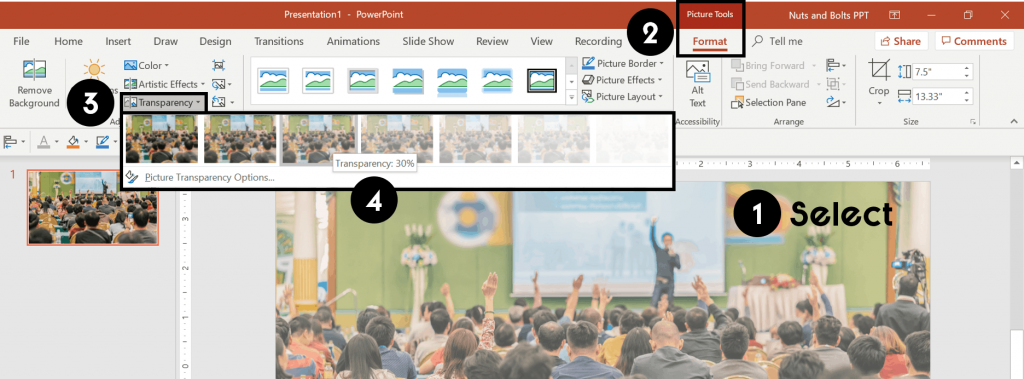
To brand an image background transparent using theTransparency Toolin the Microsoft Office 365 subscription, simply:
- Selectthe image you want to make transparent
- Navigate to thePic Tools Formattab
- Open theTransparency Tooloptions
- Choose from 1 of the preset transparency options, or click onMoving picture Transparency Options to choose a custom setting.
At the moment, this NEW transparency tool is but available inside the Microsoft 365 subscription.
Hopefully it volition be added to the standalone version of PowerPoint 2019 soon (only I wouldn't concur my breath).
Instead of making your image background transparent, you tin likewise remove your epitome groundwork,see our step-by-footstep guide here.
If you want to compress your images to reduce your overall file size, see our prototype compression guide here.
If you don't have an Function 365 subscription, y'all are still in luck!
While creating transparent images is one of those zany things that is technically impossible in PowerPoint, you tin can use the below work around to attain the same thing as pictured below.
How does it work (pre-2019)?
The trick to making an image transparent without the Office 365 subscription, is to first fill up an rectangle or square with your paradigm.
For whatsoever reason, PowerPoint allows you to add a transparent to a shape, but not to a picture.
So past beginning filling a shape with your picture, you are and so immune to make your image transparent. The basic steps are:
- Insert aRectangleonto your slide
- Copyyour picture (CTRL + C)
- Open theFormat Shape dialog box and go toFill
- SelectFlick or texture fill up and then click fromClipboard
- Add yourT ransparency
Run into the step-by-step tutorial beneath for additional details and tips.
Note: if y'all are applying a transparency to an creative consequence, you can exercise that straight from within theCreative Effects dialog box. You can see an example of this in our photo to sketch web log post here.
[Watch] Make an Image Transparent (Pre-2019)
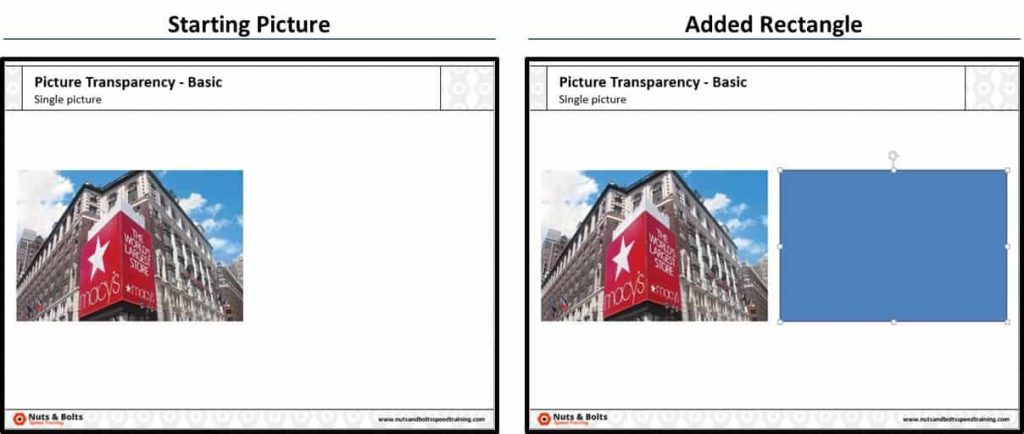
1. Insert a rectangle onto your slide
From the Insert tab, find the Shapes gallery, select a rectangle and describe it onto your slide so that it'southward the same elevation and width as your flick.
Once that's done, move the rectangle a bit to the side.
Note: If your moving picture isn't on your slide yet, make certain to do that as the outset stride.
Pro PowerPoint Tip
If your rectangle isn't the same tiptop and width as your picture, your film will likely become distorted. To avoid whatever distortion, double-check that your shape is the same pinnacle and width of your epitome.
2. Re-create your picture show
Select your picture and hitCTRL + C to copy it.
For other cool things you can do with the Re-create, Clipboard Copy and Paste special shortcuts, cheque out the video below.
Right-click your shape, select the 'Format Shape' dialog box and navigate to the Shape Fill up section.
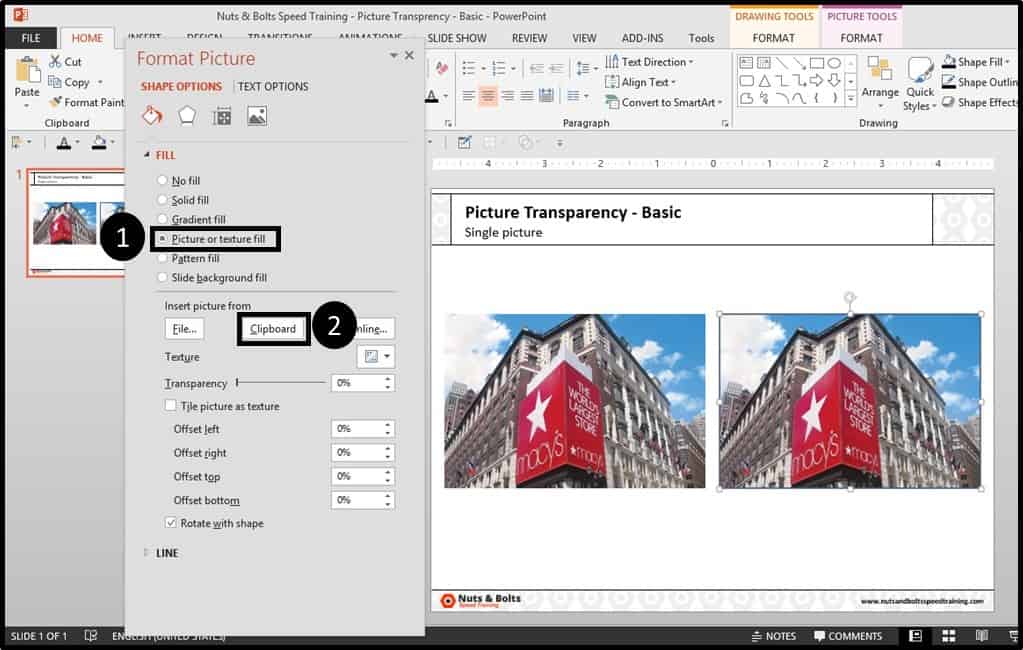
4. Select 'Picture or texture fill'
Here you have quite a number of options to work with. Since your picture is already on your slide and you lot take already copied it, just click the 'Clipboard' push button. Doing then, your rectangle will fill itself with the picture.
I am text block. Click edit button to change this text. Lorem ipsum dolor sit amet, consectetur adipiscing elit. Ut elit tellus, luctus nec ullamcorper mattis, pulvinar dapibus leo.
Pro Tip: Lock Your Aspect Ratio
Whether you lot are making a transparent prototype or not, I highly recommend locking the aspect ratio of your rectangle.
That way your paradigm won't accidentally get stretched and warped when you (or someone else) resizes the shape.
To lock the aspect ratio of your rectangle.
- Right-click your rectangle and selectSize and Position
- Tick the box next toLock attribute ratio
Pick: Fill from File
Some other option – the slower method – is to fill the shape with a picture from a file on your computer by choosing 'File,' and then selecting a picture.
This method can be used when the picture is not already on your slide, but you risk warping it if the dimensions aren't right (run across warning in pace #1).
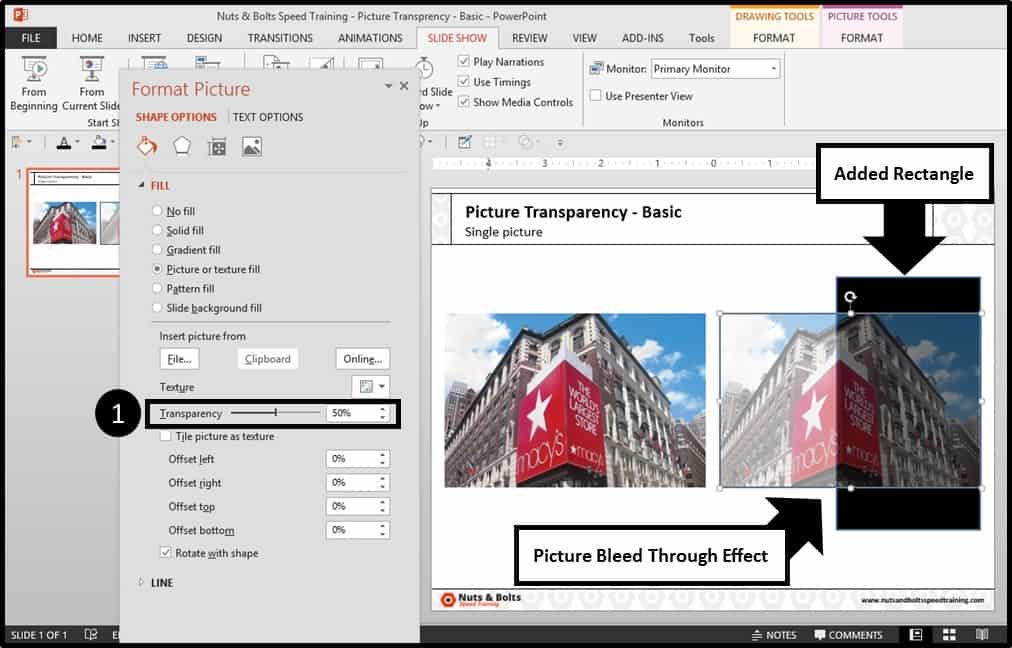
5. Adjust your image transparency settings
Now to brand your picture transparent, simply utilize the transparency slider or input the % of transparency you would like. In this example I'1000 using l%.
Troubleshooting warped pictures
If your picture appears warped or stretched, hither are ii things to double-cheque:
- Cheque that your rectangle has the aforementioned height and width dimensions of your picture. If your rectangle is larger or smaller, your photograph volition be stretched.
- Check that your offset values at the lesser of the dialog box are all set up to 0%.
Transparent Background Examples
Yous might be wondering when you lot'd always want to brand an image or movie transparent?
The main reason is that it opens upward absurd image overlays, allowing you to combine two dissimilar images together in 1.
Below are some examples of transparent images that I've stack on top of each other to create cool result. And as you an see, the heaven is the limit!
Some other example is if you are really excited virtually football game similar we are, you could take the members from your favorite team and superimpose them over your dwelling house stadium to create the blow cool effect!
[Watch] Adv. Transparent Background Technique
If you are working with lots of images in PowerPoint and y'all want to brand them all transparent, you can utilize my my Power Cropping technique.
Basically, you feel all of your pictures backwards through SmartArt, which automatically pushes all of your images into shapes then that you can and then just adapt their transparency.
To see this advanced transparent background technique in action, scout the brusque video below.
You can see a step-by-step blog post of this video hither.
As you tin see, regardless of which version of PowerPoint yous have, you tin quickly make your photos transparent.
The easiest way is with the new transparency slide in the Microsoft Office 365 subscription. This allows you lot to apace make your image backgrounds transparent.
If y'all enjoyed tutorial and desire to have your PowerPoint skills to the next level, yous tin can bank check out our PowerPoint preparation courses and resource hither.
Your PowerPoint Misery Ends Here!
Sign up now to see how four footling-known secrets are turning peoples' PowerPoint headaches into loftier-fives… and saving them at to the lowest degree 40 hours each year.
You'll also get our newsletter with the best PPT tips on the spider web, which you tin can unsubscribe from with i click.
We collect and protect your information in accordance to our Privacy Policy
How to Make an Image Semi-transparent in Powerpoint TUTORIAL
Posted by: melissaforepland.blogspot.com


Comments
Post a Comment